Backcountry Sloppy Joes


Backcountry Sloppy Joes is a tangy, sweet backpacking dinner idea easy to make and loaded with flavor. Dehydrate these ingredients at home, then just add water on trail. Rich in protein and fiber with wholesome flavor, Backcountry Sloppy Joes will satisfy after a long day’s hike.

Since this is a new post category Backpacking Meals, I give a lot of information and basics for dehydrating foods at home. So, to allow you to cut to the chase, you can hit the Jump to Recipe button above or jump to the section you want here:
Table of contents
Do you backpack, bruh?
Backcountry Sloppy Joes is the first post in a new category on my blog: Backpacking Meals. See, I am a backpacker. I got into hiking a couple years ago, and my love for being outdoors in that super isolated way, away from everything loud and busy, has just grown and grown. So what better thing for a food blogger to do than post backpacking dinner ideas.
I started with a couple day hikes in the Lake District in England. Then I graduated to an overnight in Mount Rainier National Park. Then a day in Palo Duro Canyon in Texas. And then I learned of the Florida Trail which runs the length of the state from the Everglades to the Panhandle and literally passes near where I live.
Last year, I backpacked 167 miles of the Appalachian Trail. Then I hiked Half Dome in Yosemite Valley (didn’t make it to the top though cuz that sh*t was scary). And this summer, I will thru-hike the 211 mile John Muir Trail from Yosemite Valley to Mount Whitney. You could say backpacking and I have gotten pretty serious, and I have the laundry room full of equipment to prove it.
So, getting gear is easy. I now own 4 tents, 3 stoves, 4 sleep pads, 4 backpacks (just sold 2, so I was at 6), etc, etc. And let us not even discuss the crap I have for when I take my dog with me. Seriously.
But the hard part – similar to when I do long distance triathlon – is getting food and nutrition right. And similar to triathlon, it eventually boils down to sheer calories – with the exception that on long hikes, we need to make sure we get protein. While hiking, calories are easy, but protein is harder because it needs to be preserved.
Why you should dehydrate your own dinners for backpacking
I do not cook on trail. Let Me Repeat: I Do Not. Cook on Trail. I rehydrate. After a day of hiking, I make camp, boil water, add to a dehydrated backpacking dinner to rehydrate, then eat, for the following 3 reasons:
- I am very wary of attracting animals to my camp. Usually, I am alone and any backpacker will tell you that in a tent at night e-v-e-r-y sound is amplified. “Did a pinecone just drop? Or is it Sasquatch.” …So I want cleanup to be absolutely minimal with no dishwater waste to dispose of because I do draw the line at drinking grey water.
- I really try to abide by Leave No Trace principles as much as I can and want the waste I haul out with me to also be minimal for the weight savings.
- By only having to boil 2 cups water per day, I can get away with carrying less fuel.
Note, 2) and 3) are related in that: Less weight = more miles + less injury. That’s a biggie with me.
All of the above requirements can be met by purchasing backpacker meals through any variety of companies, and I would be lying if I said I don’t do that too. BUT, that gets expensive, quickly, especially now when I am planning a 21-day thru hike in the Sierra Nevada Mountains.
So by dehydrating ingredients and putting together delicious, lightweight dinners of my own, I save a ton of money and meet all my requirements to keep camp clean, leave no trace, have minimal waste, use less fuel, stay light, and save money.
Then, of course, I also get the benefit of controlling the ingredients, additives, calorie content, and flavor.
The basics of dehydrating food
While I am not going to include an extensive rundown of how to dehydrate in this post, I do want to take this space and point out some basics so that a novice can make this recipe.
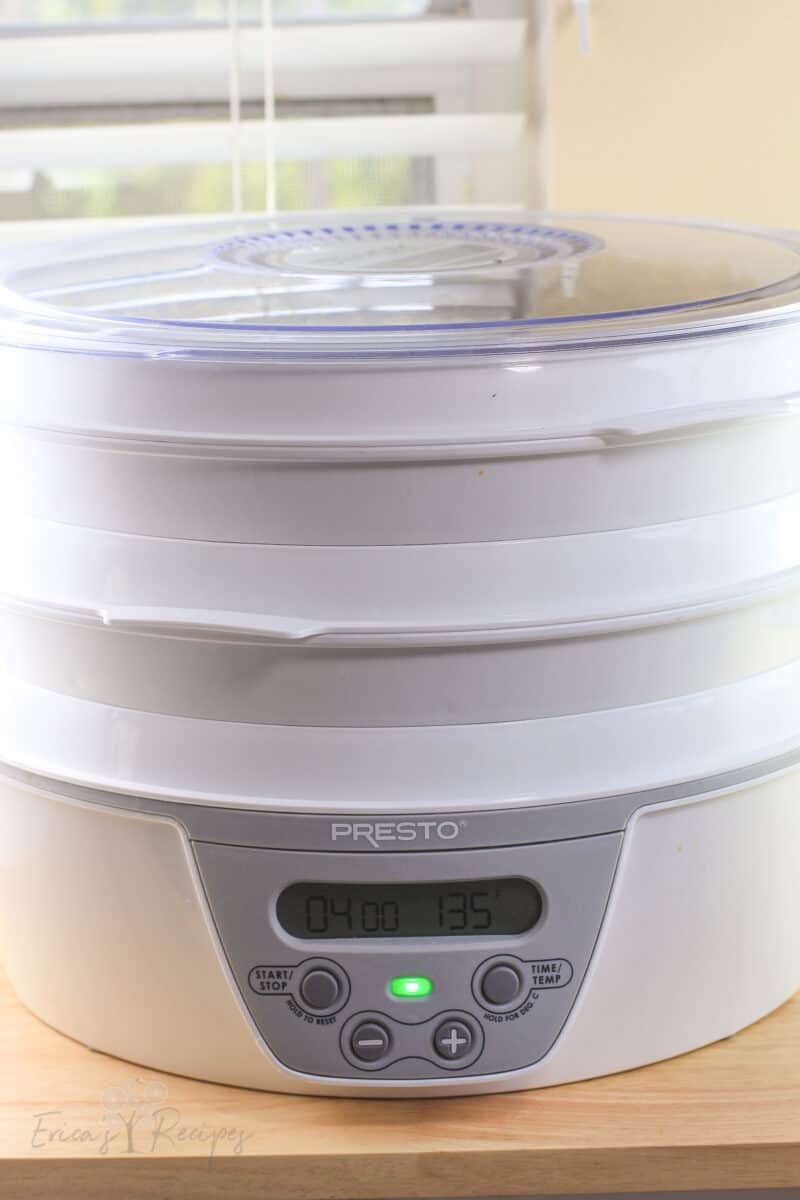
First, a dehydrator works best. They are available online, they are easy to use – as easy as a slow cooker or air fryer – and they work better than using an oven. I have not dehydrated much in an oven, other than to make Beef Jerky, but I find using a dehydrator very easy and straightforward.
Second is that while most dehydrators come with mesh tray inserts for foods in little bits, I do find that taking a minute (not even) to cut out a piece of parchment paper, and using that as a liner, makes dehydrating much easier. Parchment paper helps better to keep little bits of food from falling through. It also allows better air circulation than using the fruit leather tray (unless, of course, for fruit leather).
Veggies do much better dehydrating for backpacking dinners when they are precooked. I roast peppers. I use canned peas, carrots, and tomatoes. Because these foods are precooked, their cell walls already broken somewhat making them much more amenable to giving up, and then taking back in, water.
Generally, it works better to dehydrate ingredients separately – then combine – as opposed to making a whole meal, then dehydrating. This is exactly what I did for this sloppy joe trail recipe. Different ingredients dehydrate differently, so this process accounts better for that.
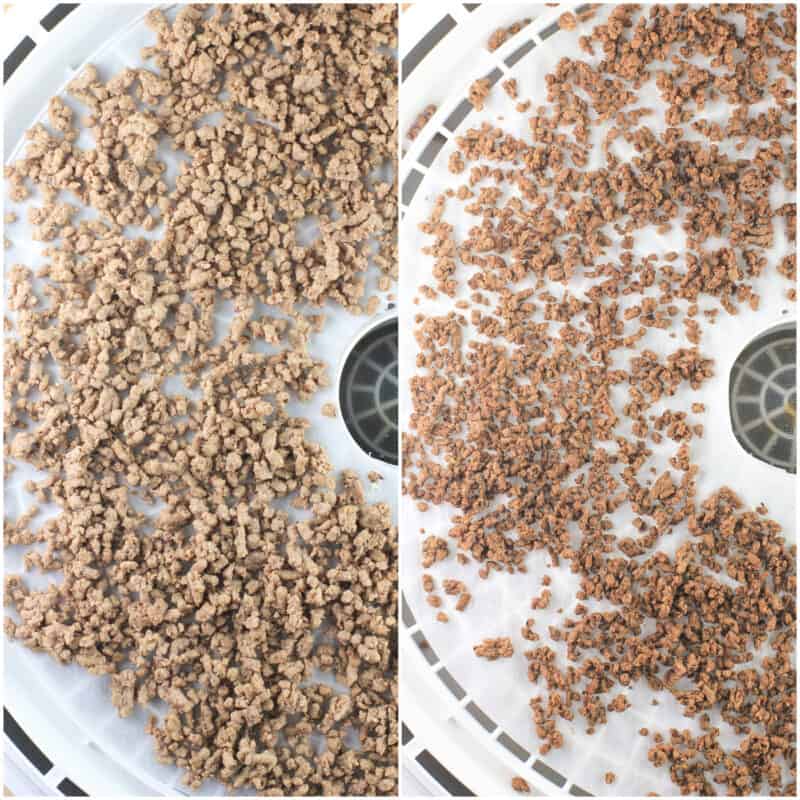
Dehydrating meat is tricky. Canned chicken and canned shrimp (broken in teensy pieces) works. Ground beef, done as described below, does surprisingly well. This is why I am starting with this recipe as my first for this series. I have not tried turkey or pork yet, those will come in the future.
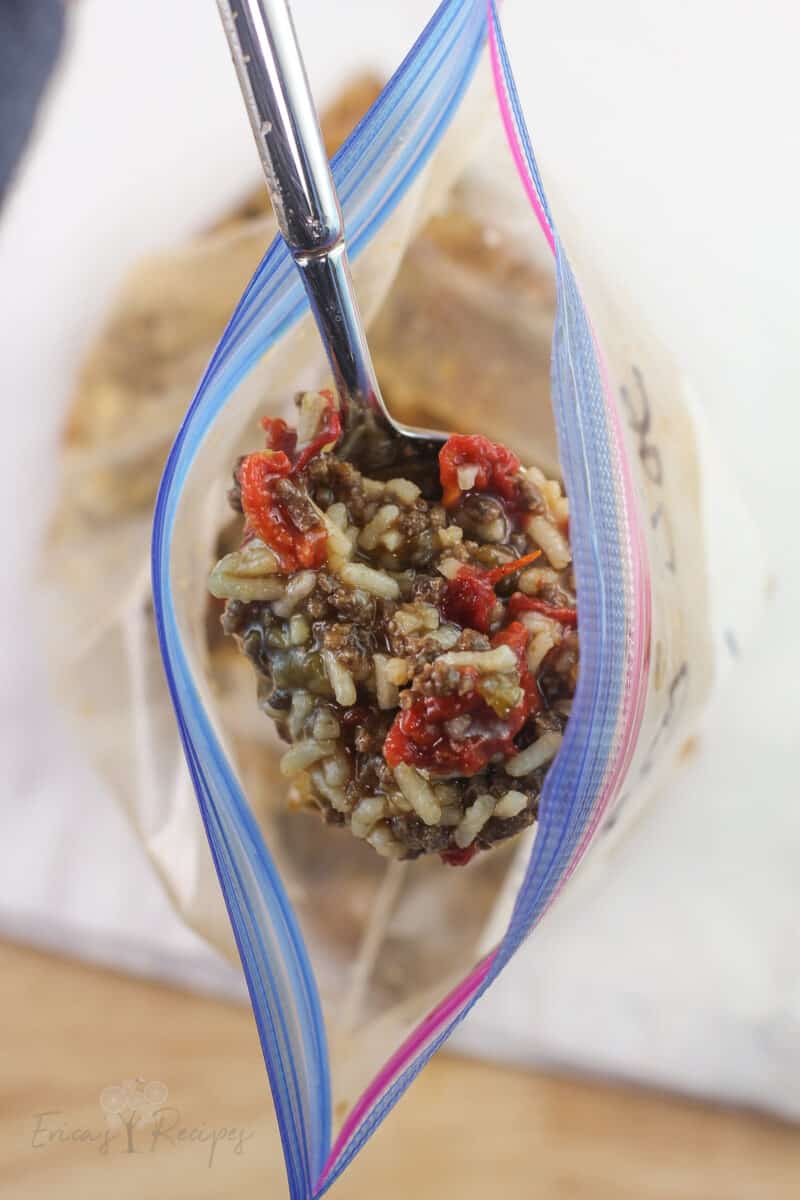
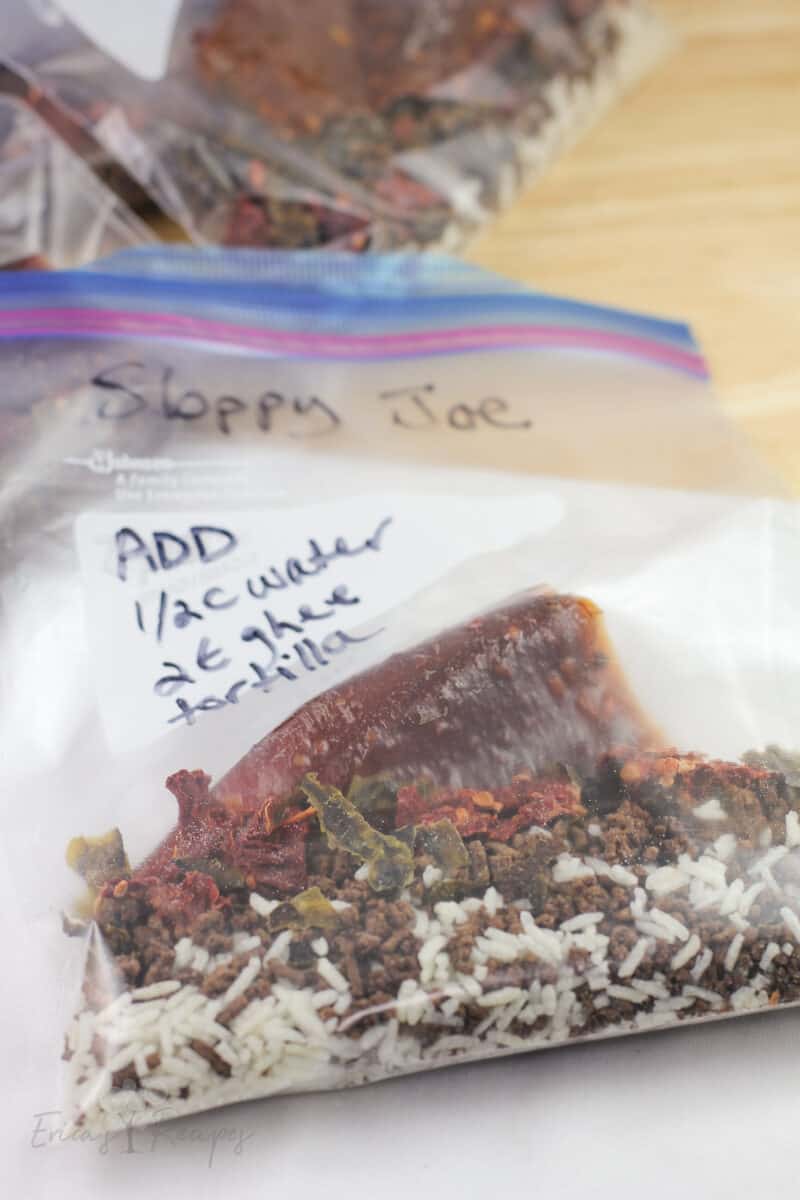
The last point to make about putting together your own backpacking meal is packaging. Use a quart-sized resealable freezer bag and make sure it is a freezer bag and not storage.
The freezer bags can take the boiling water perfectly fine. They are also made of food-grade, low density polyethylene just as food vacuum bags are, and they will not leach chemicals (i.e. BPA) into your food.
Rehydrating dinner on trail
This is the easy part: add water.
I have a BRS 3000T gas can stove (0.95 oz) and an AntiGravity Gear pepsi can alcohol stove (0.63 oz). I have the new JetBoil Stash ultralight stove on order to cook at elevation on the JMT. With each, I only use to boil 1-2 cups water in the evening for dinner and a cup for coffee in the morning.
First big question is how much water to add to rehydrate dinner. On this, I err on the side of caution, for it is better to add less, then add a bit more, than to add too much water because you can’t take it back out.
I learned this the hard way on the Appalachian Trail. At camp, I was exhausted and added a full 2 cups water to my Stovetop, chicken, and broccoli dinner having completely forgotten I had only used half a box of stuffing.
I learned this lesson hard that night as I was drinking my Stovetop stuffing “soup”. Add as little water as you can because you can always add more.
Why this recipe works
My Sloppy Joe Pasta recipe and my Bacon Cheddar Beer Grilled Sloppy Joes have one big thing in common: they are both ridiculously easy to make. In fact, making my Backcountry Sloppy Joes recipe is harder than either, simply because of the dehydration time.
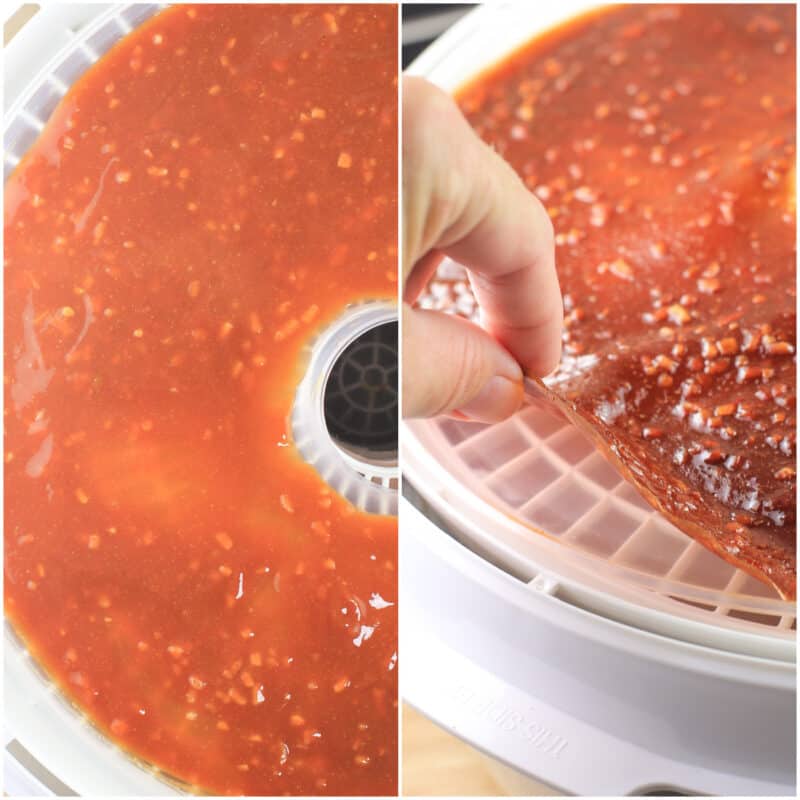
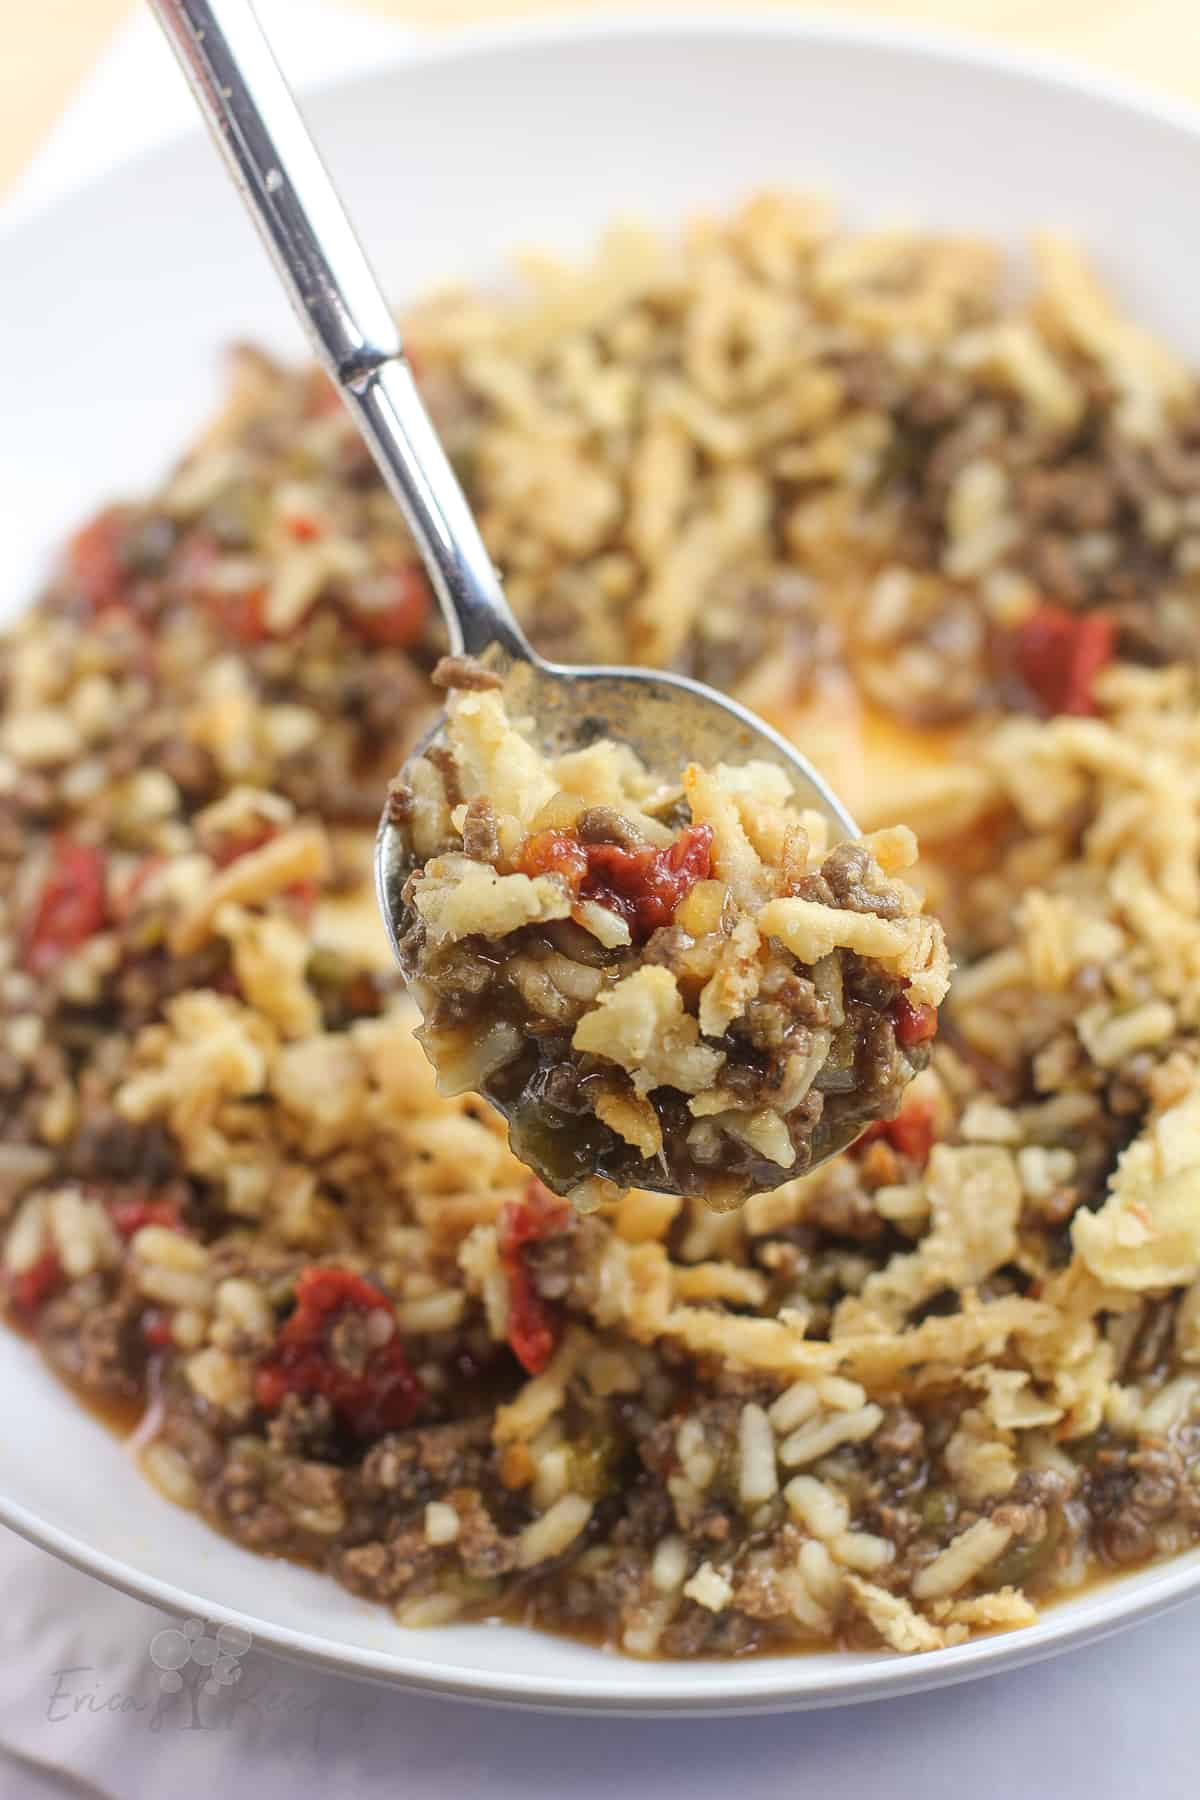
Lean ground beef dehydrates very well, as do roasted peppers and tomato. The sauce “leather” – think, fruit roll-ups – was the big experiment here, and that works perfectly.
These ingredients are easy to prepare, straightforward to dehydrate, and all rehydrate well, making this a great starter recipe for dehydrating your own backpacking meals at home.
Basic steps
Steps for the dehydrator
The first thing we do is cook 2 ingredients: the bell peppers and ground beef.
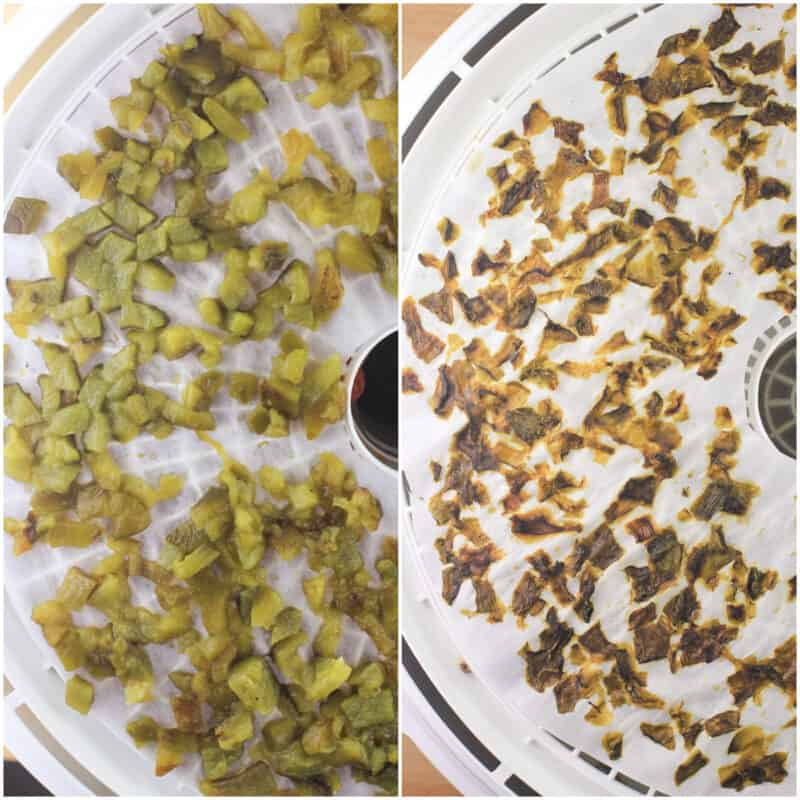
Using the oven broiler, we roast the bell peppers. Let them steam in a bag, discard the seeds and skins, and chop.
We brown the ground beef, then run the cooked meat under hot water to rinse away as much fat as possible. Fat does not dehydrate (there is no water to remove), so even though lean beef does not have much fat, it was some and we want as much of it gone as we can get.
Next, we combine the ingredients for the Sloppy Joe sauce just by mixing in a bowl.
Then we set up our ingredients to dehydrate – roasted peppers, beef, sauce, and tomatoes – using the trays that came with the dehydrator per the manufacturer’s instructions. As I note above, and below, I also line my trays with parchment paper.
Assembling the dinner
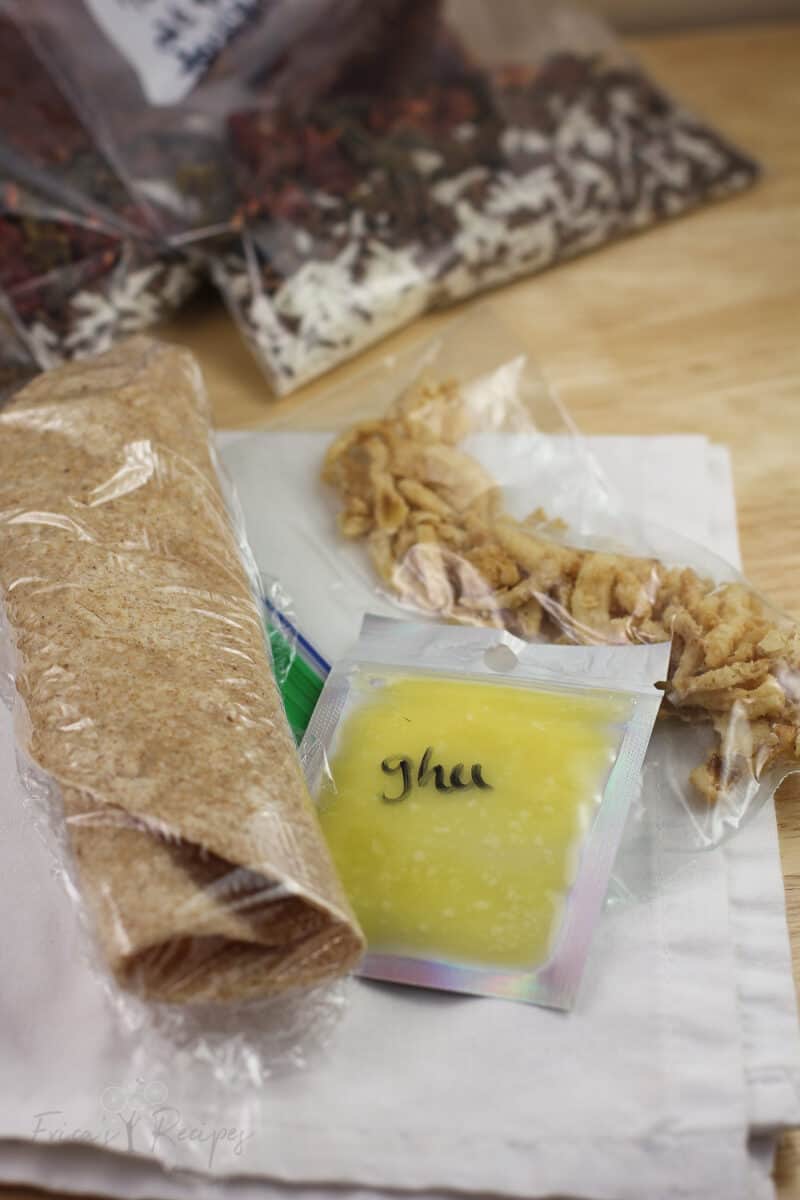
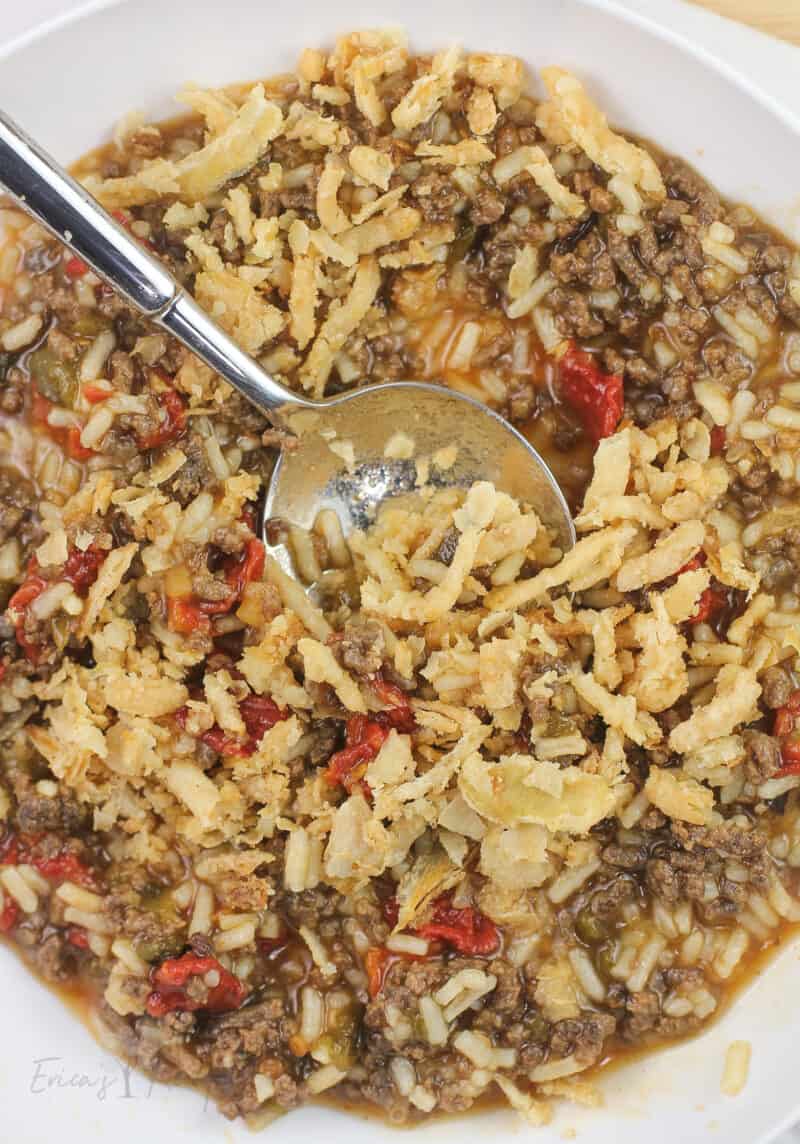
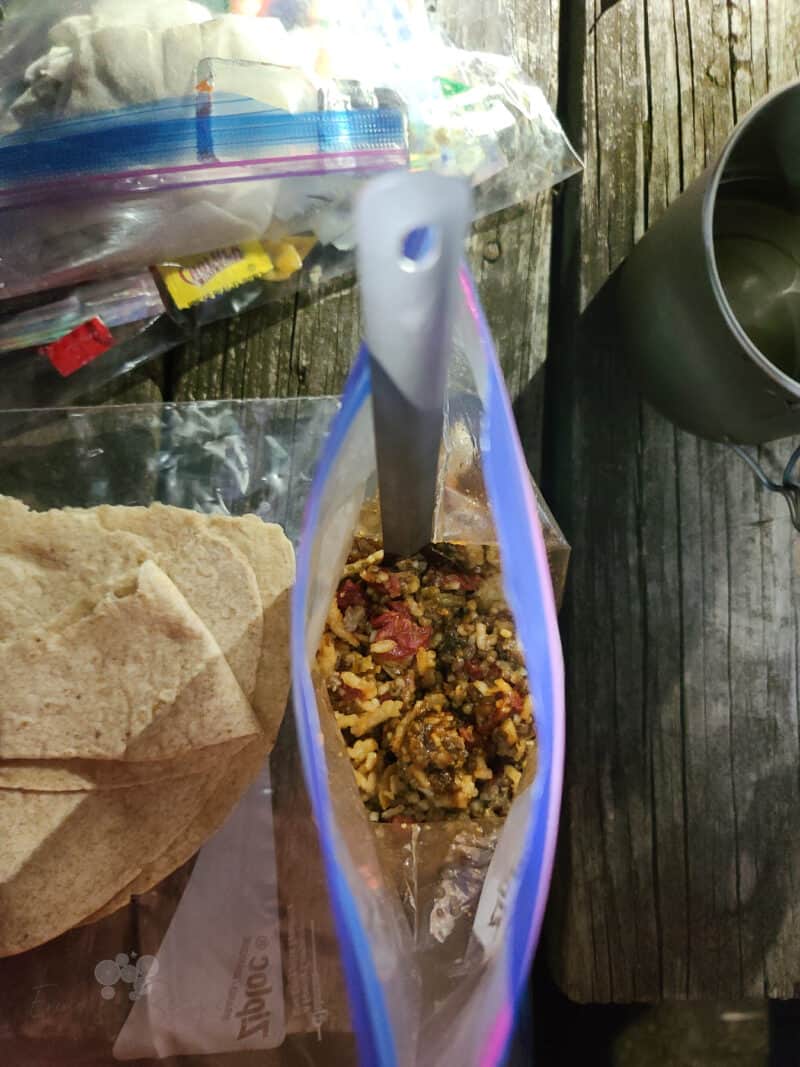
Once all our backcountry sloppy joes ingredients are dehydrated, we divide them between 4 resealable freezer bags. To each bag, we add Minute Rice to bulk up calories cuz we gon be hungrayyy on trail.
Separately, we package our tortilla, ghee, and fried onions. All of these are optional, but I personally get super satisfied dipping my tortilla “bread” in the Sloppy Joe mix. I also appreciate the salt and crunch of the fried onions, and I like the creaminess, flavor, and calories the ghee provides.
Eating on trail
Simply stir in the ghee and add 1/4 cup water to the dinner in the bag. Seal and let sit 15-20 minutes. Check halfway and add more water if necessary. Top with the onions. Serve with the tortilla.
Tips
With any backpacking dinner, it is best to add less water to these to start, then add more if needed to avoid ending up with a soupy dinner. I usually start with almost half of what a recipe or instructions call for. My Backcountry Sloppy Joes recipe accounts for this.
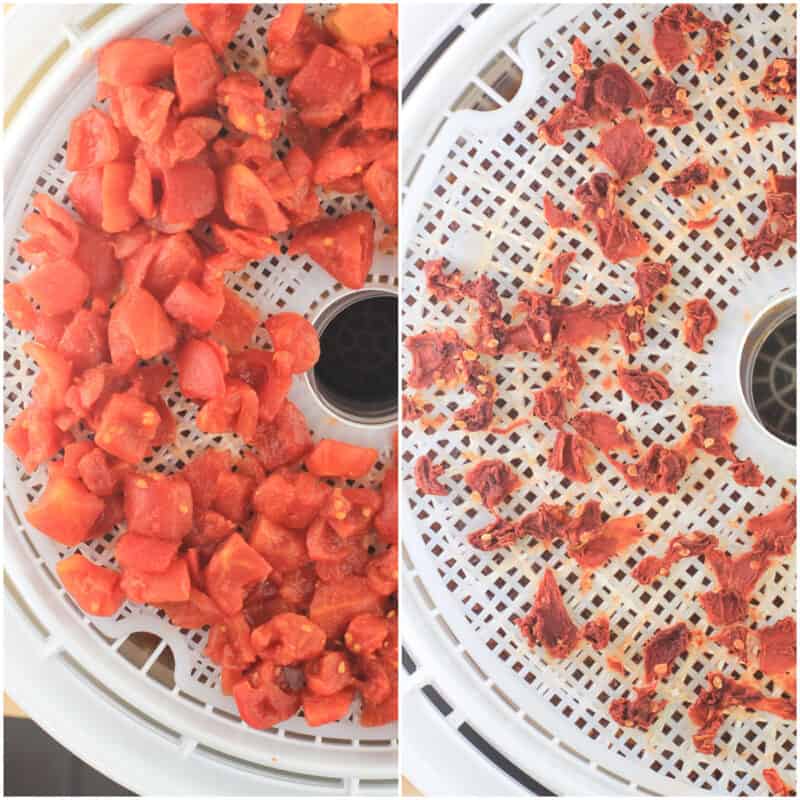
To cut down on the dehydration time of the tomatoes, use petite-diced tomatoes as an alternative to regular diced. Either way, I recommend using canned tomatoes rather than fresh because they rehydrate really well.
The amount of calories can be scaled up by adding more rice or scaled down by omitting the ghee. If adding more rice, add an equal amount more water to compensate when rehydrating.
Do not add oil (vegetable, butter, olive oil, or cooking spray) to the ground beef when cooking. Oil and fats do not dehydrate, this is why I add some ghee on trail.
I find that lining the dehydrator tray with parchment paper makes dehydrating most foods much easier. I lay a piece on a cutting board, use an insert (such as the one for fruit leather) as a stencil, then a sharp knife to trace and cut out the shape.
Small Mylar bags (such as for the ghee and fried onions) are available online and very affordable. They make packing small amounts of condiments and sauces easy, they don’t leak, and they are even sealable using a hair straightener or curling iron.
FAQs
I have not tried using other ground meat like pork or turkey, and I will update this post with that information if I do. That said, I don’t see why they would not work. I have tried chicken meat (not ground), and it does not rehydrate well.
Not really, unfortunately, UNLESS you are willing to cook on trail. Same goes for pasta. Either can be used in this recipe if you want to make it more nutritious; however, neither will rehydrate well without simmering/cooking on trail. A lot of backpackers do that (think Ramen, Knorr sides, etc.) – I just don’t like to because I do not like dealing with clean-up in the evening.
Theoretically, backpacking dinners are like apocalypse food and you can store forever at room temperature. But I prefer an extra bit of caution, especially with meat, so I store my dehydrated food in a dedicated refrigerator drawer (i.e. isolated from fresh foods so as not to pick up odors) in resealable freezer bags until I am ready to use.
Backcountry Sloppy Joes
Ingredients
For the dehydrator
- 2 large green bell peppers
- 1 ¼ lb lean ground beef such as 93/7
- 2 tsp raw turbinado sugar
- 3 tsp yellow mustard
- ¾ cup ketchup
- 2 Tbsp Worcestershire sauce
- 1 tsp kosher salt
- ½ tsp garlic powder
- 2 tsp dried minced onion
- 1 (28 oz) can diced tomatoes drained
- 1 cup plain Minute Rice divided
For the trail (per dinner)
- 2 tsp ghee
- 2 Tbsp fried onions or Fritos see Notes
- 1 large whole wheat tortilla
Instructions
For the dehydrator
- Heat oven broiler to high.
- Place bell peppers 1-inch under broiler and roast, turning every 5-6 minutes, until skin is black and blistered. Transfer to a large resealable bag, seal, and allow to steam 15 minutes. Once cool enough to handle, remove and discard skins and seeds. Chop into small (1/4-inch) pieces. Transfer to a dehydrator tray.
- While peppers are cooking/cooling: In a large nonstick skillet, brown and crumble the ground beef. Drain, then rinse well in a colander with hot water for a couple minutes to get rid of residual fat. Using your fingers, break up the meat into teeny pieces. Transfer to a dehydrator tray, dividing between 2 trays if necessary to allow the meat to be spread out.
- In a small bowl, combine the sugar, mustard, ketchup, Worcestershire sauce, salt, garlic powder, and minced onion. Transfer to a dehydrator tray on a fruit leather insert.
- Transfer the diced tomatoes to a dehydrator tray.
- Set dehydrator to 135°F and dehydrate for 4 hours, to start.
- Each recipe element will take a different time to dehydrate, and this will fluctuate further with the specific dehydrator used. Ballpark dehydration times are as follows:Ground beef: 4 hoursGreen bell peppers: 3-4 hoursTomatoes: 6 hoursSloppy Joe sauce "leather": 10-12 hours
- As each ingredient is done, pull it from the dehydrator and divide amongst 4 quart resealable freezer bags. To each bag, add ¼ cup Minute Rice.
For the trail
- Add ¼-⅓ cup boiling water and the ghee to a Sloppy Joe bag. Seal and allow to rehydrate 15 minutes (ensure the sauce "leather" is submerged). Mix well, add more water if necessary, and allow to rehydrate an additional 5 minutes.
- Serve topped with fried onions with a tortilla for dipping.